Follow these steps to implement your widget:
STEP 1: Sign in to your Clutch account.
STEP 2: From your Vendor Dashboard, select the Marketing Collateral section header to locate Widgets
-
-
- You can also access widgets directly using this link.
-
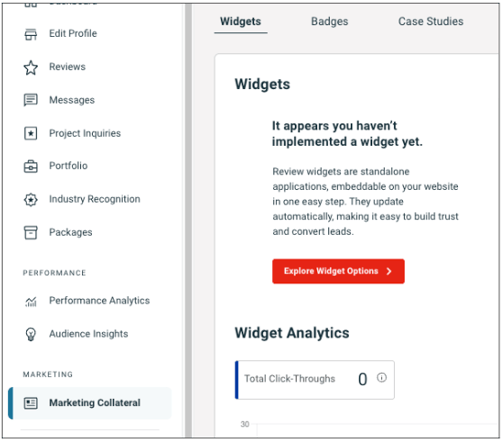
STEP 3: Click Explore Widget Options
STEP 4: Choose the widget style you’d like to add.
Customization Options: (provider exclusions apply):
-
-
-
- Adjusting colors (all widgets)
- Adjusting widget width (larger widgets only)
- Selecting which reviews to highlight (testimonial widgets only)
-
-
NOTE: Only providers with a Clutch Verified subscription or those using our Sponsoring or Featured Listing advertising products can access these customization features.
STEP 5: Copy the widget script and paste it into the body of your site where you want the widget to appear.
-
-
- Alternatively, share the script with your development team.
- Alternatively, share the script with your development team.
-

Where to Place Your Widget
Add widgets where they’ll get the most visibility. High-traffic pages are best for showing off reviews or collecting new ones.
Popular placement ideas:
|
Widget Type |
Suggested Placement |
|
Essential widgets |
Footer or homepage. (Styles include: Sticker, Compact, and Social Icon) |
|
Review collector |
Best on high-traffic pages that talk about your company — such as the Homepage, Contact page, About Us, Case Studies, or Testimonials page |
|
Testimonial widgets |
Homepage, Testimonials page, or Case Studies page (as a content block) |
|
Review data widgets |
Dedicated Testimonials page or seamlessly on a Contact page |
Using more than one widget is a great way to both highlight your reviews and encourage new ones.
NOTE: If you're placing the widget in your site's footer, please update the code to set data-nofollow="true" in order to comply with SEO best practices.